

Thursday, 8 November 2012
Taking a spore print
Before you reach for the microscope, which, let’s be honest – most of us don’t have, taking spore prints can be the ‘make or break’ solution for any identification. All you need to see is the ‘colour’ of the spore deposit (reproductive spores dropped from the underside of the cap). If you have not done this before, it’s very easy to do.
Simple example: Once you have your mushroom back at home, simply cut off the stem as close the cap as you can. Place the cap (gills down) on a sheet of blank white paper or similar. Leave undisturbed for 3-4 hours or leave overnight for the best results.
When the time is ready, simply remove the cap from the paper to see the results.
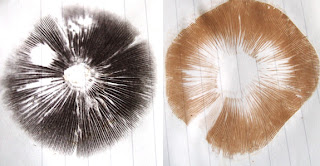
This is a quick and simple method in creating a spore print. Check the colour results in daylight rather than under an electric source. You may have something similar to the following examples:
 There are naturally many variations in colour, including white or pale pink. So it’s sometimes best to place the cap over both black and white coloured paper. The white spores will be more noticeable on a darker background.
If you do not wish to remove the stem, simply cut a hole in some cardboard (or heavier weight paper), slot the stem through the hole and place the card on the rim of a tall glass so the mushroom is gently suspended on the card.
It’s also best to make note of the sometimes subtle variations of the same colour produced by several species. ie. you will encounter many ‘brown’ shades, ranging from very light/pale, medium to strong or rust-like. There are also many white to cream colour variations too.
There are naturally many variations in colour, including white or pale pink. So it’s sometimes best to place the cap over both black and white coloured paper. The white spores will be more noticeable on a darker background.
If you do not wish to remove the stem, simply cut a hole in some cardboard (or heavier weight paper), slot the stem through the hole and place the card on the rim of a tall glass so the mushroom is gently suspended on the card.
It’s also best to make note of the sometimes subtle variations of the same colour produced by several species. ie. you will encounter many ‘brown’ shades, ranging from very light/pale, medium to strong or rust-like. There are also many white to cream colour variations too.
Subscribe to:
Post Comments (Atom)

I have some shrooms I picked i live in the redwoods would like to c if any one can identify the good ones for me if any i took spore prints to so far there has bn like a Orange one a blackish purple one a black one and some that needed black paper thanks for your help?
ReplyDelete